(Start Here) Upgrade Support and Requirements
Upgrading
directly to version 3.9 is supported for onQ Appliances and protected nodes running any previous release. If you want to migrate to an onQ Flex configuration, simply install your new onQ Flex license—after you upgrade to 3.9 (see
Install onQ Appliance license).
Frequently Asked Questions:
Question | Answer |
When should I expect to see the Install Updates button? | Upgrade packages are deployed through onQ Central. onQ Appliances and onQ Archive Vaults auto-download the necessary packages when the daily cron job runs. This job runs between 10pm and 2am each day. This deployment occurs for all onQ Appliances and onQ Archive Vaults for which onQ Central is set, by Quorum Support, to allow download of the latest software packages. If you received an upgrade announcement from Quorum Support, but do not see the Install Updates button in the onQ Portal and want to upgrade immediately, contact Quorum Support. |
Do I need to upgrade my Appliances in any particular order? | No (Single‑tenant). However, be sure to upgrade both HAs, DR Appliances, and onQ Archive Vaults synchronously. Yes (Multi‑tenant). Upgrade them one tenant at a time and sequentially. Due to the changes in the underlying platform, this approach is required to prevent onQs from becoming non‑bootable. |
Do I need to initiate a reboot of onQ or appliance? | No (On‑Premise). onQ upgrade process automatically reboots onQ twice, followed by one onQ Appliance reboot thereby applying an important vulnerability (VENOM) patch for Xen Server.
Yes (DRaaS). Reboot your HA Appliance after Quorum Support upgrades and reboots your cloud AV/DR. Quorum Support notifies you when the reboot is needed. Quorum Support adheres to the following reboot order: AV > DR > and HA. |
Do I need to stop protection to apply Appliance updates? | No. If protection is on, onQ quiesces the system, stops protection, applies the new software, then restarts protection. |
What if I experience a problem during the upgrade? | Browse the troubleshooting tips in Upgrade Problems. If you still have an issue, contact Quorum Support. |
Before you upgrade:
Behavior/Change | What should I do? |
In a File Backup Only configuration, onQ does not back up files and folders that do not have the corresponding disks and mount points defined and protected. | Add the disks and mount points to reflect the files and folders in your Include List. For more information, go to Edit backup include list. 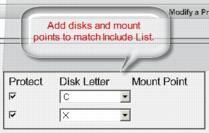 |
As outlined in Agent‑less PN Enrollment Limitations, onQ is not able to enroll XFS mount points automatically for agent‑less Linux PN. | For all previously enrolled Linux PNs with XFS mount points, add the XFS mount points manually: in the Modify a Protected Node dialog, click the plus (+) button to add a mount point. |
After you upgrade:
Behavior/Change | What should I do? |
onQ Portal provides UI enhancements. | Refresh your browser using CTRL-F5. If you don’t, portal changes will not be activated and some user actions will not work. |
onQ Flex configurations, both new and existing, provides RN type to augment the Build type. onQ Portal sets RN type as follows: Auto RN Creation=Yes > R2R Auto RN Creation=No > OD | Nothing. Automatic. For more information, go to (onQ Flex) Modify RN type and/or RN build policy. |
(Agent‑less PNs only) There are two related changes that require your attention: Due to a change in how onQ interacts with an ESXi host, the upgrade process needs to purge any Quorum history associated with the PNs; afterward, onQ needs to perform a full backup of those PNs. Also, onQ needs to add a Quorum “history” volume (QuorumDisk.vmdk) to the RNs in order to optimize the resources it spends on performing backups. | Prior to restarting onQ protection, re‑install all existing proxies to activate these changes. Afterward, re-initialize each agent‑less RN to enable onQ to add the Quorum volume. QuorumDisk.vmdk is added as a protected volume; therefore, onQ can no longer protect up to 15 volumes: onQ now supports up to 14 volumes for agent‑less RNs. If you have an RN that is configured with 15 volumes, unprotect one of those volumes, then re-intialize the RN. |
Next Step: Now that you’ve read this topic, you’re ready to upgrade. Go to
Update Appliance software.