Back up and restore Oracle 11g database on Linux
Oracle recommends that you use
RMAN to perform backups and restores of your databases.
Presumably you’re already running RMAN scripts to back up and restore your Oracle databases in production—a best practice for any business continuity plan. This procedure walks you how to back up and restore using Quorum’s example scripts. Feel free to insert hooks into these backup and restore scripts so as to execute the scripts you’re already using.
Quorum’s pre_snap.sh script is optional; for example, you might prefer to use cron jobs or other scheduler; as such, discuss these options with your Linux Oracle Database Administrator.
You should not have any difficulties using your existing scripts in an onQ environment because backup and restore operations are independent of onQ. However, before you use your scripts in an onQ environment, ensure that they are performing database backups and restores as expected.
If you do not currently have a backup and restore strategy in place, involve an experienced Linux Oracle Database Administrator before you deploy onQ. onQ is one component of your backup and restore strategy.
(Step 1) To install and modify example RMAN scripts:
This procedure works for Linux 6.2 RNs, though this procedure should also work on other os versions. Quorum’s example RMAN scripts use RMAN to back up and restore a single DB instance and uses onQ to activate the backup script. Modify these scripts as needed. The following example is a basic proof-of-concept.
1. Download Quorum’s example scripts, then modify these scripts to fit your Oracle environment (RMAN version):
pre_snap.sh | Performs the database backup by calling oracle_backup.sh. There are many ways to trigger DB backup script: cron jobs, third-party scheduler, or application, for example; however, onQ Portal provides a way to trigger this pre_snap.sh script before it backs up the protected volumes (see Step 5). This script can be modified to simply call an existing backup script that you’re currently using in your environment: 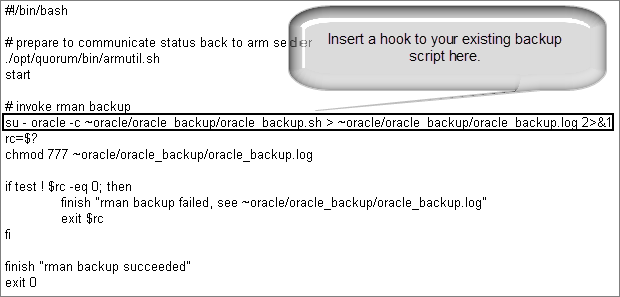 |
oracle_backup.sh | Coordinates rman backup of the Oracle database.The onQ Service runs this script before the Quorum backup process. Modify this script to specify the details of your Oracle installation: ORACLE_BASE=/opt/oracle ORACLE_HOME=$ORACLE_BASE/product/11.2.0/db_1 Change the parameters for your database: BACKUP_BASE=/backup01 BACKUP_AREA=${BACKUP_BASE}/rdbms/physical/orcl BACKUP_LOG_DIR=~/oracle_backup Modify for your Oracle SID: db=orcl This script can be replaced with an existing database backup script that you’re currently using in your environment. |
oracle_restore.sh | Coordinates rman restore/recovery of the Oracle database. Use this script to restore and recover the Oracle database if automated crash recovery fails. Modify this script to specify the details of your Oracle installation: ORACLE_BASE=/opt/oracle ORACLE_HOME=$ORACLE_BASE/product/11.2.0/db_1 Change the parameters for your database: BACKUP_BASE=/backup01 BACKUP_AREA=${BACKUP_BASE}/rdbms/physical/orcl BACKUP_LOG_DIR=~/oracle_backup Modify for your Oracle SID: db=orcl This script can be replaced with an existing database backup script that you’re currently using in your environment. This script should be available in advance of your need to recover: as a best practice, always test a recovery before the need arises. |
armutil.sh armSender vmmonCtl | Communicates pre_snap.sh execution status to onQ, and depends on armSender and vmmonCtl executables in x64 or i386 folder. |
2. Log on to the PN as oracle user (for example, su - oracle) and create a /home/oracle/oracle_backup directory.
3. Now that you’ve modified oracle_backup.sh and oracle_restore.sh, copy them to /home/oracle/oracle_backup on the PN.
4. As root user, copy armutil.sh and armSender and vmmonCtl from x64 or i386 folder, depending on the PN’s architecture, to /opt/quorum/bin on the Linux PN that’s running the Oracle database.
The armSender and vmmonCtl are tools to communicate status to the onQ Manager.
5. As root user, copy pre_snap.sh to /opt/quorum/bin/ on the PN, then activate this script on the onQ Portal.
a. Log on to the HA’s onQ Portal.
b. From the PROTECTION CONFIG tab, select the PN that’s running the Oracle 11g database, then MODIFY > ADVANCED.
c. Enable the pre snapshot script on that PN by selecting the Execute Pre Snapshot script?: Yes radio button.
That’s it! Now you’re ready to test the backup process.
(Step 2) To back up the Oracle database:
This procedure works for Linux 6.2 RNs, though this procedure should also work on other os versions.
1. Load some known data into the Oracle database (for example in ORCL catalog).
The PN’s
Event Log displays the following messages as onQ builds the RN. These messages also appear in
oracle_backup.log on the PN:
• Pre-snapshot command returned: rman backup succeeded (as coded in pre_snap.sh), if rman backup passes. For example:
RHEL62x64-19-87: system: 2014-12-30 13:34:19: Pre-snapshot command returned: rman backup succeeded |
• Pre-snapshot command returned: rman backup failed (as coded in pre_snap.sh), if rman backup fails. For example:
RHEL62x64-19-87: system: 2014-12-30 13:11:37: Pre-snapshot command returned: rman backup failed, see ~oracle/oracle_backup/oracle_backup.log |
If the RMAN backup fails, consult Oracle’s
RMAN documentation to fix the problem. The RMAN backup must succeed before you proceed with the restore.
If the backup succeeded, you’re ready to test the restore process.
(Step 3) To restore the Oracle database:
This procedure works for Linux 6.2 RNs, though this procedure should also work on other os versions.
After the RN boots, the Oracle database should perform crash recovery automatically. The database either opens successfully or it doesn’t:
• (Case A) The database opens successfully and is ready for connection with no need for recovery, as shown in the following output; therefore,
skip to Step 4.
[root@RHEL62x64-19-87 oracle_backup]# su - oracle [oracle@RHEL62x64-19-87 ~]$ sqlplus / as sysdba SQL*Plus: Release 11.2.0.1.0 Production on Tue Dec 23 09:22:06 2014 Copyright (c) 1982, 2009, Oracle. All rights reserved. Connected to an idle instance. SQL> startup; ORACLE instance started. Total System Global Area 1603411968 bytes Fixed Size 2213776 bytes Variable Size 1124075632 bytes Database Buffers 469762048 bytes Redo Buffers 7360512 bytes Database mounted. Database opened. SQL> connect SCOTT/<password> Connected. SQL> select count(*) from qa_test; COUNT(*) ---------- 27472 |
• (Case B) The Oracle database does not open successfully, as shown in the following output. You need to perform the recovery procedure; therefore, proceed to the next step:
[root@RHEL62x64-19-87 oracle_backup]# su - oracle [oracle@RHEL62x64-19-87 ~]$ sqlplus / as sysdba SQL*Plus: Release 11.2.0.1.0 Production on Tue Dec 23 09:22:06 2014 Copyright (c) 1982, 2009, Oracle. All rights reserved. Connected to an idle instance. SQL> startup; ORACLE instance started. Total System Global Area 1603411968 bytes Fixed Size 2213776 bytes Variable Size 1124075632 bytes Database Buffers 469762048 bytes Redo Buffers 7360512 bytes Database mounted. ORA-03113: en-of-life on communication channel Process ID: 2235 Session ID: 1 Serial number: |
2. On the RN, run the restore/recovery script to restore the Oracle database onto the RN:
# cd /home/oracle/oracle_backup # ./oracle_restore.sh |
Optionally, you can run the commands manually as shown in the following example output:
Invoke the restore/recovery script:
[oracle@RHEL62x64-19-87 ~]$ cd /home/oracle/oracle_backup [oracle@RHEL62x64-19-87 oracle_backup]$ ./oracle_restore.sh Recovery Manager: Release 11.2.0.1.0 - Production on Tue Dec 23 09:32:15 2014 Copyright (c) 1982, 2009, Oracle and/or its affiliates. All rights reserved. RMAN> set echo on; 2> connect target *; 3> shutdown immediate; 4> startup mount; 5> restore database; 6> shutdown immediate; 7> startup mount; 8> recover database; 9> alter database open; 10> exit; echo set on connected to target database: ORCL (not mounted) using target database control file instead of recovery catalog Oracle instance shut down connected to target database (not started) Oracle instance started database mounted Total System Global Area 1603411968 bytes Fixed Size 2213776 bytes Variable Size 1124075632 bytes Database Buffers 469762048 bytes Redo Buffers 7360512 bytes ... |
Restore/recovery begins and completes:
Starting restore at 23-DEC-14 allocated channel: ORA_DISK_1 ... restore from backup set ... channel ORA_DISK_1: restore complete, elapsed time: 00:02:45 Finished restore at 23-DEC-14 database dismounted Oracle instance shut down connected to target database (not started) Oracle instance started database mounted Total System Global Area 1603411968 bytes Fixed Size 2213776 bytes Variable Size 1124075632 bytes Database Buffers 469762048 bytes Redo Buffers 7360512 bytes Starting recover at 23-DEC-14 allocated channel: ORA_DISK_1 channel ORA_DISK_1: SID=18 device type=DISK starting media recovery media recovery complete, elapsed time: 00:00:03 Finished recover at 23-DEC-14 database opened Recovery Manager complete. |
3. Verify that the RN’s Oracle database is up and running and in a usable state, and that it shows the expected data:
[oracle@RHEL62x64-19-87 oracle_backup]$ sqlplus / as sysdba SQL*Plus: Release 11.2.0.1.0 Production on Tue Dec 23 09:44:55 2014 Copyright (c) 1982, 2009, Oracle. All rights reserved. Connected to: Oracle Database 11g Enterprise Edition Release 11.2.0.1.0 - 64bit Production With the Partitioning, OLAP, Data Mining and Real Application Testing options SQL> connect SCOTT/<password> ' Able to connect to DB after restore and recovery Connected. SQL> select count(*) from qa_test; COUNT(*) -------- 27472 SQL>EXIT; |