Start recovery nodes on HA
In the event of a
disaster, you might need to start an individual recovery node or a group of recovery nodes on HA.
Use this procedure in conjunction with the appropriate failover or failback procedures.
When you start an RN, whether agent‑based or agent‑less, you are indirectly shutting down the PN and PN proxy (VM) respectively and disabling backups for that PN.
On an HA there are two ways to start individual recovery nodes or a group of recovery nodes:
• in production mode — use this mode if your primary protected node failed and you want to immediately start the recovery nodes in your production environment. After you fix the PN, don’t forget to stop the recovery node before bringing the PN online; otherwise, there will be network conflicts.
• in test mode — use this mode if you simply want to verify that the recovery node will run in the event of a disaster or to test a host running new server updates.
| Note: So as to avoid network conflicts, if the corresponding PN is already running in production, the onQ Portal will not let you start the RN in production. In that case, the onQ Portal displays the following error message: 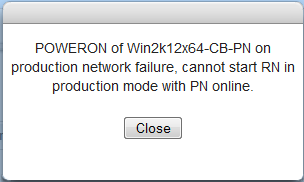 |
You may be prompted to install application-specific software licenses upon startup of recovery nodes.
If you want to start
all DR recovery nodes, go to
Start recovery nodes on DR Appliance or DR Mirror.
(From RN tab) To start a group of recovery nodes in production mode or test mode:
1. From the HA, go to DASHBOARD tab > RECOVERY NODES page.
3. For the group, click the
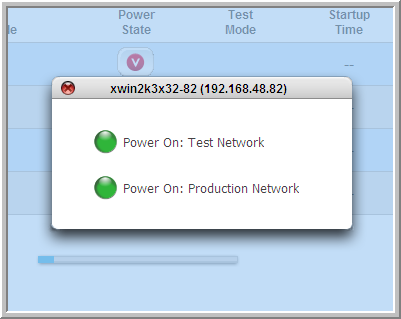
Power State (

) button.
4. Select either Power On: Test Network or Power On: Production Network.
(From RN tab) To start an individual recovery node in production mode:
3. Shut down the corresponding PN, if it’s online.
4. From the HA, go to DASHBOARD tab > RECOVERY NODES page.
6. Click the button in the Power State column, then choose to enable or disable backups.
A dialog box appears that offers you a choice to disable backups for the RN (aka Recovery PN).
• If you’re trying to recover from a failed PN, it’s important that backups continue.
• If you are testing an RN in production after applying server updates, you might want to disable backups.
.

Another dialog box appears that offers you a choice between the following two alternatives: Power On: Test Network or Power On: Production Network.
7. Choose the Power On: Production Network power option.
8. If you have an Oracle database, you must restore it now. Go to:
(From PN tab) To start an individual recovery node in production mode:
3. Go to DASHBOARD tab > PROTECTED NODES page.
5. Click on the Connection Status button for the recovery node that you want to start.
An information box appears that offers you this option: Power ON the Recovery Node on the Production Network.
6. Click Continue, to start the recovery node. If the recovery node has already started, this request does nothing.
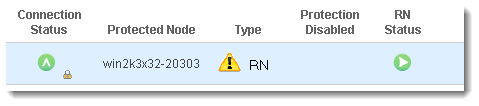
During the start up of the RN, the power indicator turns yellow with a green arrow:

Soon after, an exclamation icon appears to the right of the protected node and the
Type field changes to
RN, indicating that the recovery node is now running.
7. if you have an Oracle database, you must restore it now. Go to:
To start an individual recovery node in test mode:
1. Go to DASHBOARD tab > RECOVERY NODES page.
3. Click the button in the Power State column.
A box appears that offers you a choice between the following two alternatives: Power On: Test Network or Power On: Production Network.
4. Click on the
Power On: Test Network power option.
A
check mark appears in the
Test Mode column of the appropriate status page, indicating that the recovery mode is running in test mode.
6. Perform your testing.
7. After you test the node, return it to production:
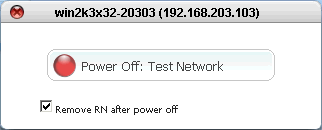
a. Click the button in the Power State column.
b. (Optional) Clear the Remove RN after power off check box if you want to retain this RN, keeping in mind that it is outdated.
c. Click Power Off: Test Network option.
The icon in the Power State column changes color and orientation. There might be a delay of several seconds or minutes before the icon shows a change.
If you cleared the
Remove RN after power off check box, then the following dialog will open the next time the RN is started.
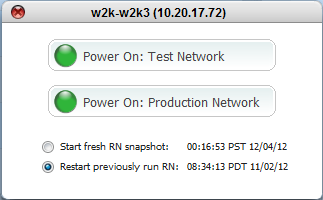
8. Choose Start fresh RN snapshot or Restart previously run RN as appropriate.