onQ supports both agent‑based and agent‑less PNs. To protect agent‑less PNs, you indirectly enroll PNs by enrolling the ESX/ESXi server itself. onQ’s VMware Real Agentless protection provides the following benefits:
|
•
|
However, before you deploy agent‑less PNs, consider the tradeoffs outlined in Agent‑less PN Enrollment Limitations.
VMware‑hosted nodes, whether Windows or Linux, do not require that an agent (onQ Service) be installed on the PN. Instead, two PN proxies will be automatically installed on the ESX/ESXi server (aka Proxy Host) when you enroll that ESX/ESXi server: one Linux PN proxy (LPY_<onQhostname>_<ESXhostname>) and one Windows PN proxy (WPY_<onQhostname>_<ESXhostname>) for each onQ. All PNs on a given ESX/ESXi server and having the same operating system (Linux or Windows) will share a common PN proxy.
|
3.
|
Click the PROTECTION CONFIG tab.
|
The Add Protected Nodes via Host dialog appears.
|
5.
|
|
a.
|
In the virtual machine list, select the check boxes (or ALL button) for the PNs that you want to enroll. If you do not see a virtual machine does not appear in the list, it’s likely that the virtual machine does not have VMware Tools installed.
|
|
•
|
Windows proxy address. The state IP address that you reserved for the Windows PN proxy.
|
|
•
|
Linux proxy address. The state IP address that you reserved for the Linux PN proxy.
|
In the following example, three Windows PN are being enrolled, so only one static IP address (for the Windows PN proxy WPY_<onQhostname>_<ESXhostname>) is needed: 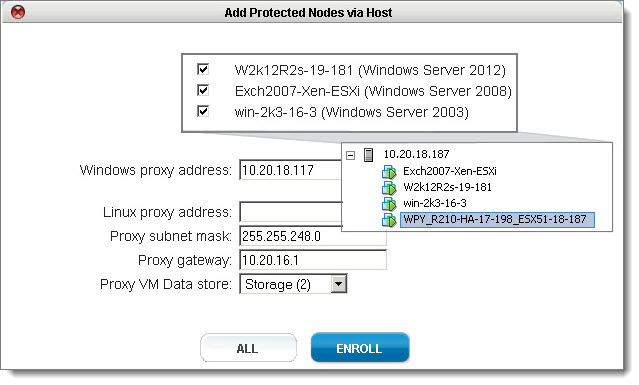
|
c.
|
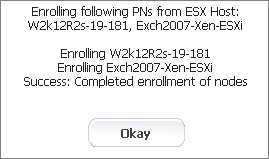
The PNs that you selected appear in the Protected Nodes list; however, they are unverified as evidenced by the status in the PROTECTED NODES page > Protection Disabled column.
|
8.
|
Activate (aka verify) the PNs so that onQ can protect them.
|
|
a.
|
|
b.
|
Specify values for the node parameters, then SAVE. The act of saving a PN’s configuration instructs onQ to activate that PN’s configuration.
|
The onQ Portal groups the PNs by ESXi server. If you do not want these PNs in such a group, clear the default Group Name field to remove the PNs from this group and place them in the shared pool.