onQ supports both agent‑based and agent‑less PNs. To protect agent‑less PNs, you indirectly enroll PNs by enrolling the ESX/ESXi server itself. onQ’s VMware Real Agentless protection provides the following benefits:
|
•
|
However, before you deploy agent‑less PNs, consider the tradeoffs outlined in Agent‑less PN Enrollment Limitations.
VMware‑hosted nodes, whether Windows or Linux, do not require that an agent (onQ Service) be installed on the PN. Instead, two PN proxies will be automatically installed on the ESX/ESXi server (aka Proxy Host) when you enroll that ESX/ESXi server: one Linux PN proxy (LPY_<onQhostname>_<ESXhostname>) and one Windows PN proxy (WPY_<onQhostname>_<ESXhostname>) for each onQ. All PNs on a given ESX/ESXi server and having the same operating system (Linux or Windows) will share a common PN proxy.
|
a.
|
Enable ssh on the ESXi/ESX server.
|
|
d.
|
The Add Protected Nodes via Host dialog appears.
|
e.
|
|
f.
|
In the virtual machine list, select the check boxes (or ALL button) for the PNs that you want to enroll.
|
|
•
|
Windows proxy address. The static IP address that you reserved for the Windows PN proxy.
|
|
•
|
Linux proxy address. The static IP address that you reserved for the Linux PN proxy.
|
|
•
|
Proxy subnet mask. The PN proxy’s subnet mask.
|
|
•
|
Proxy gateway. The PN proxy’s gateway.
|
|
•
|
Proxy VM Data store. The directory in which the vm’s files are stored.
|
|
•
|
Proxy VM Network. Your network configuration can include a vCenter-level Distributed Virtual Switches (DVS) or an ESXi host-level virtual switch. When you enroll an ESXi host, all available networks that are visible to that host are listed and available for selection.
|
In the following example, three Windows PN are being enrolled, so only one static IP address (for the Windows PN proxy WPY_<onQhostname>_<ESXhostname>) is needed: 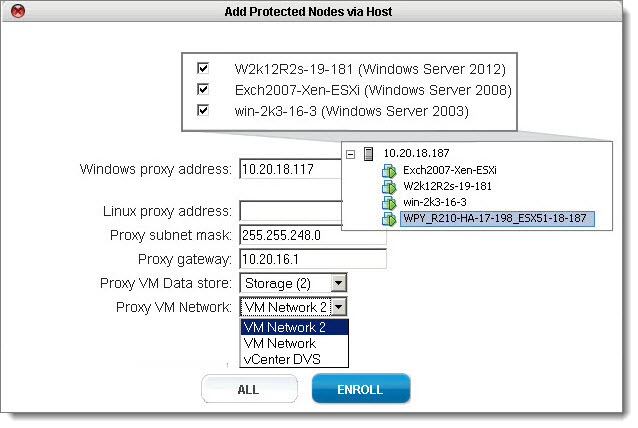
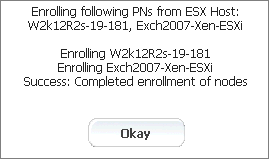
The PNs that you selected appear in the Protected Nodes list; however, they are unverified as evidenced by the status in the PROTECTED NODES page > Protection Disabled column.
|
h.
|
Activate (aka verify) the PNs so that onQ can protect them.
|
Specify values for the node parameters, then SAVE. The act of saving a PN’s configuration instructs onQ to activate that PN’s configuration.
The onQ Portal groups the PNs by ESXi server. If you do not want these PNs in such a group, clear the default Group Name field to remove the PNs from this group and place them in the shared pool.
|
2.
|
Log on to the PN and open the following ports on the firewall in order for onQ to communicate with the PN.
|
|
•
|
UDP port 5990
|
|
•
|
|
3.
|
(Oracle database) Install RMAN scripts.
|
If the PN has an Oracle database, install the RMAN scripts so that onQ can execute a hot backup of your database as outlined in Back up and restore Oracle 10g+ database on Windows.
|
a.
|
Enable ssh on the ESXi/ESX server.
|
|
d.
|
The Add Protected Nodes via Host dialog appears.
|
e.
|
|
f.
|
In the virtual machine list, select the check boxes (or ALL button) for the PNs that you want to enroll.
|
|
•
|
Windows proxy address. The static IP address that you reserved for the Windows PN proxy.
|
|
•
|
Linux proxy address. The static IP address that you reserved for the Linux PN proxy.
|
|
•
|
Proxy subnet mask. The PN proxy’s subnet mask.
|
|
•
|
Proxy gateway. The PN proxy’s gateway.
|
|
•
|
Proxy VM Data store. The directory in which the vm’s files are stored.
|
|
•
|
Proxy VM Network. Your network configuration can include a vCenter-level Distributed Virtual Switches (DVS) or an ESXi host-level virtual switch. When you enroll an ESXi host, all available networks that are visible to that host are listed and available for selection.
|
In the following example, three Windows PN are being enrolled, so only one static IP address (for the Windows PN proxy WPY_<onQhostname>_<ESXhostname>) is needed:
The PNs that you selected appear in the Protected Nodes list; however, they are unverified as evidenced by the status in the PROTECTED NODES page > Protection Disabled column.
|
h.
|
Activate (aka verify) the PNs so that onQ can protect them.
|
Specify values for the node parameters, then SAVE. The act of saving a PN’s configuration instructs onQ to activate that PN’s configuration.
The onQ Portal groups the PNs by ESXi server. If you do not want these PNs in such a group, clear the default Group Name field to remove the PNs from this group and place them in the shared pool.
|
2.
|
Create the grub boot menu. In order to boot the RN successfully, the PN needs to prepare the init ram disk image with the required drivers and legacy grub boot menu.
|
|
# cat /etc/redhat-release
|
|
b.
|
|
# rpm -qa | grep e2fsprogs
|
|
# yum install e2fsprogs
|
|
c.
|
Generate the init ram disk with xen drivers and ext4 file system modules.
|
|
# uname -r
|
Where the 3.10.0-123.13.2.el7.x86_64 is the kernel release by default, change it to match PN's kernel release:
|
# cd /boot
# mkdir -p /boot/grub
|
|
# vi /boot/grub/grub.conf.xvf5
|
Where the 3.10.0-123.13.2.el7.x86_64 is the kernel release by default, change vmlinuz and initramfs to match PN's kernel release. The kernel parameters are on a single line. Simply copy and paste from following screen.
Where the root=UUID=855cd484-3852-4984-b568-ee0408c6b590, the 855cd... (UUID) is a temporary placeholder and will be replaced by read “/”'s UUID during the RN build. Do not make any changes to this parameter.
For example: The contents of /boot/grub/grub.conf.xvf5:
From /boot, validate that vmlinuz-3.10.0-123.13.2.el7.x86_64 and initramfs-3.10.0-123.13.2.el7xen.x86_64.img exist in /boot folder as shown in the example below:
|
# ls /boot/vmlinuz-3.10.0-123.13.2.el7.x86_64
# ls /boot/initramfs-3.10.0-123.13.2.el7xen.x86_64.img
|
|
•
|
7.0:
6.x:
5.x:
To find the driver versions packed inside the init ram file system (initramfs) of the boot menu: Locate the initramfs and kernel name from the boot menu prepared for the RN (you’ll find it under /boot), then use the following command to peek the contents of initramfs. For example:
|
# grep kernel /boot/grub/grub.conf.xvf5
# grep initrd /boot/grub/grub.conf.xvf5
# lsinitrd /boot/initramsfs-3.10.0-123.el7xen.x86_64.img|grep modules
|
|
# grep kernel /boot/grub/grub.conf.xvf5
# grep initrd /boot/grub/grub.conf.xvf5
# zcat /tmp/initrd-2.6.18-371.el5xen.img.5|cpio ‑t|grep ‑E “xen|ext”
|
|
3.
|
Log on to the PN and open the following ports on the firewall in order for onQ to communicate with the PN.
|
|
•
|
UDP port 5990
|
|
•
|
By default, RHEL 7.0 has introduced a new firewall service, a dynamic firewall daemon known as firewalld, instead of iptables service by default; however, the traditional iptables service is supported if installed. For details, see the Red Hat Linux 7 Security Guide. If you choose to disable firewalld, there is no need to configure firewalld firewall rules: simply skip this procedure.
firewalld daemon and service and iptables service are using iptables commands to configure the netfilter in the kernel to separate and filter the network traffic. firewalld stores it in various XML files in /usr/lib/firewalld/ and /etc/firewalld/.
The firewalld firewall defines how networks zones can be used to separate networks into different zones. Based on the level of trust, you can decide to place devices and traffic within a particular network zone. Each mutable network zone can have a different combination of firewall rules.
|
[root@RHEL70x64-17-167 services]# systemctl status firewalld.service
|
|
g.
|
Associate the zone(s) with the following firewall rules. The same rules can be applied to many zones as needed. In the following example, dcrm-node service is associated with work zone for ens32. The dcrm-node.xml is located at /usr/lib/firewalld/services.
|
The RN will be equipped with eth0 interface, so apply the rules to eth0 interface's zone if different from PN's zone. The PN might not have eth0 interface; in such a case, the RN's eth0 will be in the default zone.
Determine your default zone. In this example default zone is Public. Since eth0 has no zone dcm-node is associated with Public zone:
|
# iptables -L –n | grep -E "5900|5000"
|
|
# iptables -L -line numbers
10 REJECT all -- anywhere anywhere reject-with icmp-host-prohibited
|
Using the line number of the REJECT line and the chain name (line 10 and line 1, respectively, in the step above), insert the onQ ports:
|
# iptables -I RH-Firewall-1-INPUT 10 -m state --state NEW -p tcp --dport 5990 -j ACCEPT
# iptables -I RH-Firewall-1-INPUT 10 -m state --state NEW -p tcp --dport 5000 -j ACCEPT
|
Afterward, verify that the ports are open and above the REJECT line as outlined earlier.
|
# service iptables save
# service iptables restart
|
|
2.
|
If the PN has an Oracle database, install the RMAN scripts so that onQ can execute a hot backup of your database as outlined in Back up and restore Oracle 11g database on Linux.
|
a.
|
Enable ssh on the ESXi/ESX server.
|
|
d.
|
The Add Protected Nodes via Host dialog appears.
|
e.
|
|
f.
|
In the virtual machine list, select the check boxes (or ALL button) for the PNs that you want to enroll.
|
|
•
|
Windows proxy address. The static IP address that you reserved for the Windows PN proxy.
|
|
•
|
Linux proxy address. The static IP address that you reserved for the Linux PN proxy.
|
|
•
|
Proxy subnet mask. The PN proxy’s subnet mask.
|
|
•
|
Proxy gateway. The PN proxy’s gateway.
|
|
•
|
Proxy VM Data store. The directory in which the vm’s files are stored.
|
|
•
|
Proxy VM Network. Your network configuration can include a vCenter-level Distributed Virtual Switches (DVS) or an ESXi host-level virtual switch. When you enroll an ESXi host, all available networks that are visible to that host are listed and available for selection.
|
In the following example, three Windows PN are being enrolled, so only one static IP address (for the Windows PN proxy WPY_<onQhostname>_<ESXhostname>) is needed:
The PNs that you selected appear in the Protected Nodes list; however, they are unverified as evidenced by the status in the PROTECTED NODES page > Protection Disabled column.
|
h.
|
Activate (aka verify) the PNs so that onQ can protect them.
|
Specify values for the node parameters, then SAVE. The act of saving a PN’s configuration instructs onQ to activate that PN’s configuration.
The onQ Portal groups the PNs by ESXi server. If you do not want these PNs in such a group, clear the default Group Name field to remove the PNs from this group and place them in the shared pool.
|
2.
|
Copy and modify /boot/grub/menu.lst:
|
|
Note: If you want a custom boot menu, create a /boot/grub/grub.conf.xvf5 file. If .xvf1 thru .xvf4 exist, delete them because those files have a higher priority than .xvf5.
|
|
•
|
7.0:
6.x:
5.x:
To find the driver versions packed inside the init ram file system (initramfs) of the boot menu: Locate the initramfs and kernel name from the boot menu prepared for the RN (you’ll find it under /boot), then use the following command to peek the contents of initramfs. For example:
|
# grep kernel /boot/grub/grub.conf.xvf5
# grep initrd /boot/grub/grub.conf.xvf5
# lsinitrd /boot/initramsfs-3.10.0-123.el7xen.x86_64.img|grep modules
|
|
# grep kernel /boot/grub/grub.conf.xvf5
# grep initrd /boot/grub/grub.conf.xvf5
# zcat /tmp/initrd-2.6.18-371.el5xen.img.5|cpio ‑t|grep ‑E “xen|ext”
|
|
4.
|
Log on to the PN and open the following ports on the firewall in order for onQ to communicate with the PN.
|
|
•
|
UDP port 5990
|
|
•
|
|
# iptables -L –n | grep -E "5900|5000"
|
|
# iptables -L -line numbers
10 REJECT all -- anywhere anywhere reject-with icmp-host-prohibited
|
Using the line number of the REJECT line and the chain name (line 10 and line 1, respectively, in the step above), insert the onQ ports:
|
# iptables -I RH-Firewall-1-INPUT 10 -m state --state NEW -p tcp --dport 5990 -j ACCEPT
# iptables -I RH-Firewall-1-INPUT 10 -m state --state NEW -p tcp --dport 5000 -j ACCEPT
|
Afterward, verify that the ports are open and above the REJECT line as outlined earlier.
|
# service iptables save
# service iptables restart
|
|
2.
|
If the PN has an Oracle database, install the RMAN scripts so that onQ can execute a hot backup of your database as outlined in Back up and restore Oracle 11g database on Linux.
|
a.
|
Enable ssh on the ESXi/ESX server.
|
|
d.
|
The Add Protected Nodes via Host dialog appears.
|
e.
|
|
f.
|
In the virtual machine list, select the check boxes (or ALL button) for the PNs that you want to enroll.
|
|
•
|
Windows proxy address. The static IP address that you reserved for the Windows PN proxy.
|
|
•
|
Linux proxy address. The static IP address that you reserved for the Linux PN proxy.
|
|
•
|
Proxy subnet mask. The PN proxy’s subnet mask.
|
|
•
|
Proxy gateway. The PN proxy’s gateway.
|
|
•
|
Proxy VM Data store. The directory in which the vm’s files are stored.
|
|
•
|
Proxy VM Network. Your network configuration can include a vCenter-level Distributed Virtual Switches (DVS) or an ESXi host-level virtual switch. When you enroll an ESXi host, all available networks that are visible to that host are listed and available for selection.
|
In the following example, three Windows PN are being enrolled, so only one static IP address (for the Windows PN proxy WPY_<onQhostname>_<ESXhostname>) is needed:
The PNs that you selected appear in the Protected Nodes list; however, they are unverified as evidenced by the status in the PROTECTED NODES page > Protection Disabled column.
|
h.
|
Activate (aka verify) the PNs so that onQ can protect them.
|
Specify values for the node parameters, then SAVE. The act of saving a PN’s configuration instructs onQ to activate that PN’s configuration.
The onQ Portal groups the PNs by ESXi server. If you do not want these PNs in such a group, clear the default Group Name field to remove the PNs from this group and place them in the shared pool.
|
2.
|
Copy and modify /boot/grub/menu.lst:
|
|
3.
|
Log on to the PN and open the following ports on the firewall in order for onQ to communicate with the PN.
|
|
•
|
UDP port 5990
|
|
•
|
|
# iptables -L –n | grep -E "5900|5000"
|
|
# iptables -L -line numbers
10 REJECT all -- anywhere anywhere reject-with icmp-host-prohibited
|
Using the line number of the REJECT line and the chain name (line 10 and line 1, respectively, in the step above), insert the onQ ports:
|
# iptables -I RH-Firewall-1-INPUT 10 -m state --state NEW -p tcp --dport 5990 -j ACCEPT
# iptables -I RH-Firewall-1-INPUT 10 -m state --state NEW -p tcp --dport 5000 -j ACCEPT
|
Afterward, verify that the ports are open and above the REJECT line as outlined earlier.
|
# service iptables save
# service iptables restart
|
|
2.
|
If the PN has an Oracle database, install the RMAN scripts so that onQ can execute a hot backup of your database as outlined in Back up and restore Oracle 11g database on Linux.
|
2.
|
Click the PROTECTION CONFIG tab.
|
The Add Protected Nodes via Host dialog appears. The PN check boxes for enrolled PNs are greyed out.
|
5.
|
In the Proxy VM Network field, reattach the virtual network adapter.
|
|
6.
|
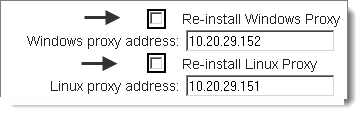
Select Re-install Windows proxy or Re-install Linux proxy, depending on the operating system of the proxy you’re trying to reinstall, then ENROLL.
 |