onQ supports both agent‑based and agent‑less PNs. Nodes that are not hosted by VMware require that an agent (onQ Service) be installed. Agent‑based enrollment enables you to use all of the operation and monitoring features that onQ has to offer.
|
•
|
install xen-aware kernel package. Unlike with RHEL 5.x, RHEL 7 and RHEL 6.x have a xen-aware kernel built-in; therefore, there’s no need to install xen-aware kernel package on theses versions.
|
|
•
|
install agent software. This task is required for all supported versions.
|
|
•
|
enforce grub boot menu. This task is required for all supported versions in order to boot the RN successfully, though the specific steps might vary for each version.
|
|
Note: By default, wget preserves the original files. Newly retrieved install.py is saved with extensions .1, .2, etc. Use the -r option (see wget man page) to overwrite the existing file.
|
|
b.
|
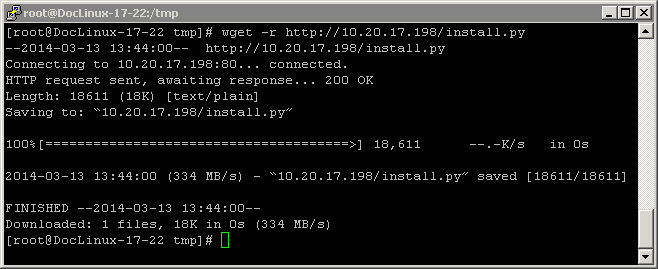
From within a folder (/tmp) where you want to save the install script, run the following command:
|
|
# wget -r http://<onQ-IP-address>/install.py
|
|
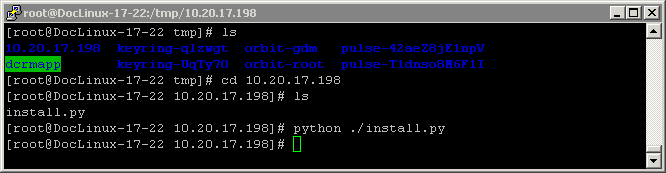
# cd <onQ-IP-address>
# python ./install.py
|
|
e.
|
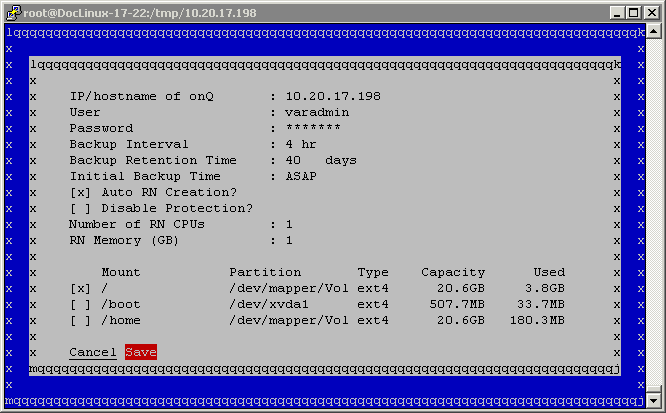
(Optional) Specify all valid values, excluding file system type and capacity because these values aren’t editable, in the node parameter fields provided and modify defaults as needed. (The install utility lists all available volumes/partitions/mount points and the onQ portal enforces any file system requirements as outlined in Linux RN Limitations.) You can make these node changes at any point after enrollment via the Protection Config tab in the onQ Portal.
|
|
f.
|
|
g.
|
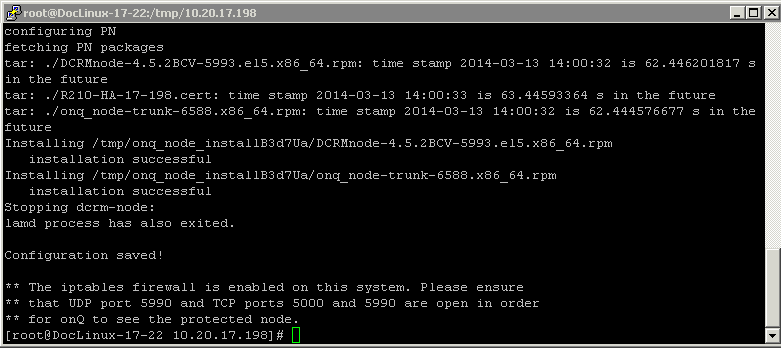
Wait! Do not press Enter. Was the installation successful? Use the error messages below to evaluate the screen output.
|
|
•
|
If no, press Enter to launch the installer UI again. Correct the problem, then repeat Step e through Step g.
|
|
Install utility stops if you type incorrect/invalid values. Correct the problem and Save again or Cancel.
|
|
|
4.
|
Install the Netcat (nc) utility, if not already installed. On your yum‑enabled PN, run the following command, then verify that the package was installed. This utility reads and writes data across network connections using TCP or UDP. onQ depends on this utility for FLR restores.
|
|
# yum install nc
# which nc
# rpm -qf /usr/bin/nc
|
|
5.
|
Create the grub boot menu. In order to boot the RN successfully, the PN needs to prepare the init ram disk image with the required drivers and legacy grub boot menu.
|
|
# cat /etc/redhat-release
|
|
b.
|
|
# rpm -qa | grep e2fsprogs
|
|
# yum install e2fsprogs
|
|
c.
|
Generate the init ram disk with xen drivers and ext4 file system modules.
|
|
# uname -r
|
Where the 3.10.0-123.13.2.el7.x86_64 is the kernel release by default, change it to match PN's kernel release:
|
# cd /boot
# mkdir -p /boot/grub
|
|
# vi /boot/grub/grub.conf.xvf5
|
Where the 3.10.0-123.13.2.el7.x86_64 is the kernel release by default, change vmlinuz and initramfs to match PN's kernel release. The kernel parameters are on a single line. Simply copy and paste from following screen.
Where the root=UUID=855cd484-3852-4984-b568-ee0408c6b590, the 855cd... (UUID) is a temporary placeholder and will be replaced by read “/”'s UUID during the RN build. Do not make any changes to this parameter.
For example: The contents of /boot/grub/grub.conf.xvf5:
From /boot, validate that vmlinuz-3.10.0-123.13.2.el7.x86_64 and initramfs-3.10.0-123.13.2.el7xen.x86_64.img exist in /boot folder as shown in the example below:
|
# ls /boot/vmlinuz-3.10.0-123.13.2.el7.x86_64
# ls /boot/initramfs-3.10.0-123.13.2.el7xen.x86_64.img
|
|
6.
|
(Recommended) Disable the Network Manager service, if installed, for self-tests to work correctly. This service is not useful in a server environment. Due to an RHEL 7.0 bug, turning off Network Manager can prevent NICs from showing up; if this occurs, re-enable the Network Manager service.
|
|
# systemctl disable NetworkManager.service
# systemctl stop NetworkManager.service
# systemctl status NetworkManager.service
|
|
•
|
7.0:
6.x:
5.x:
To find the driver versions packed inside the init ram file system (initramfs) of the boot menu: Locate the initramfs and kernel name from the boot menu prepared for the RN (you’ll find it under /boot), then use the following command to peek the contents of initramfs. For example:
|
# grep kernel /boot/grub/grub.conf.xvf5
# grep initrd /boot/grub/grub.conf.xvf5
# lsinitrd /boot/initramsfs-3.10.0-123.el7xen.x86_64.img|grep modules
|
|
# grep kernel /boot/grub/grub.conf.xvf5
# grep initrd /boot/grub/grub.conf.xvf5
# zcat /tmp/initrd-2.6.18-371.el5xen.img.5|cpio ‑t|grep ‑E “xen|ext”
|
|
8.
|
Log on to the PN and open the following ports on the firewall in order for onQ to communicate with the PN.
|
|
•
|
UDP port 5990
|
|
•
|
By default, RHEL 7.0 has introduced a new firewall service, a dynamic firewall daemon known as firewalld, instead of iptables service by default; however, the traditional iptables service is supported if installed. For details, see the Red Hat Linux 7 Security Guide. If you choose to disable firewalld, there is no need to configure firewalld firewall rules: simply skip this procedure.
firewalld daemon and service and iptables service are using iptables commands to configure the netfilter in the kernel to separate and filter the network traffic. firewalld stores it in various XML files in /usr/lib/firewalld/ and /etc/firewalld/.
The firewalld firewall defines how networks zones can be used to separate networks into different zones. Based on the level of trust, you can decide to place devices and traffic within a particular network zone. Each mutable network zone can have a different combination of firewall rules.
|
[root@RHEL70x64-17-167 services]# systemctl status firewalld.service
|
|
g.
|
Associate the zone(s) with the following firewall rules. The same rules can be applied to many zones as needed. In the following example, dcrm-node service is associated with work zone for ens32. The dcrm-node.xml is located at /usr/lib/firewalld/services.
|
The RN will be equipped with eth0 interface, so apply the rules to eth0 interface's zone if different from PN's zone. The PN might not have eth0 interface; in such a case, the RN's eth0 will be in the default zone.
Determine your default zone. In this example default zone is Public. Since eth0 has no zone dcm-node is associated with Public zone:
|
# iptables -L –n | grep -E "5900|5000"
|
|
# iptables -L -line numbers
10 REJECT all -- anywhere anywhere reject-with icmp-host-prohibited
|
Using the line number of the REJECT line and the chain name (line 10 and line 1, respectively, in the step above), insert the onQ ports:
|
# iptables -I RH-Firewall-1-INPUT 10 -m state --state NEW -p tcp --dport 5990 -j ACCEPT
# iptables -I RH-Firewall-1-INPUT 10 -m state --state NEW -p tcp --dport 5000 -j ACCEPT
|
Afterward, verify that the ports are open and above the REJECT line as outlined earlier.
|
# service iptables save
# service iptables restart
|
|
9.
|
If the PN has an Oracle database, install the RMAN scripts so that onQ can execute a hot backup of your database as outlined in Back up and restore Oracle 11g database on Linux.
|
Note: By default, wget preserves the original files. Newly retrieved install.py is saved with extensions .1, .2, etc. Use the -r option (see wget man page) to overwrite the existing file.
|
|
b.
|
From within a folder (/tmp) where you want to save the install script, run the following command:
|
|
# wget -r http://<onQ-IP-address>/install.py
|
|
# cd <onQ-IP-address>
# python ./install.py
|
|
e.
|
(Optional) Specify all valid values, excluding file system type and capacity because these values aren’t editable, in the node parameter fields provided and modify defaults as needed. (The install utility lists all available volumes/partitions/mount points and the onQ portal enforces any file system requirements as outlined in Linux RN Limitations.) You can make these node changes at any point after enrollment via the Protection Config tab in the onQ Portal.
|
|
f.
|
|
g.
|
Wait! Do not press Enter. Was the installation successful? Use the error messages below to evaluate the screen output.
|
|
•
|
If no, press Enter to launch the installer UI again. Correct the problem, then repeat Step e through Step g.
|
|
Install utility stops if you type incorrect/invalid values. Correct the problem and Save again or Cancel.
|
|
|
4.
|
Install the Netcat (nc) utility, if not already installed. On your yum‑enabled PN, run the following command, then verify that the package was installed. This utility reads and writes data across network connections using TCP or UDP. onQ depends on this utility for FLR restores.
|
|
# yum install nc
# which nc
# rpm -qf /usr/bin/nc
|
|
•
|
7.0:
6.x:
5.x:
To find the driver versions packed inside the init ram file system (initramfs) of the boot menu: Locate the initramfs and kernel name from the boot menu prepared for the RN (you’ll find it under /boot), then use the following command to peek the contents of initramfs. For example:
|
# grep kernel /boot/grub/grub.conf.xvf5
# grep initrd /boot/grub/grub.conf.xvf5
# lsinitrd /boot/initramsfs-3.10.0-123.el7xen.x86_64.img|grep modules
|
|
# grep kernel /boot/grub/grub.conf.xvf5
# grep initrd /boot/grub/grub.conf.xvf5
# zcat /tmp/initrd-2.6.18-371.el5xen.img.5|cpio ‑t|grep ‑E “xen|ext”
|
|
6.
|
(Recommended) Disable the Network Manager service, if installed, for self-tests to work correctly. This service is not useful in a server environment.
|
|
# service NetworkManager stop
# service NetworkManager status
# chkconfig NetworkManager off
# chkconfig --list NetworkManager
|
|
7.
|
Log on to the PN and open the following ports on the firewall in order for onQ to communicate with the PN.
|
|
•
|
UDP port 5990
|
|
•
|
|
# iptables -L –n | grep -E "5900|5000"
|
|
# iptables -L -line numbers
10 REJECT all -- anywhere anywhere reject-with icmp-host-prohibited
|
Using the line number of the REJECT line and the chain name (line 10 and line 1, respectively, in the step above), insert the onQ ports:
|
# iptables -I RH-Firewall-1-INPUT 10 -m state --state NEW -p tcp --dport 5990 -j ACCEPT
# iptables -I RH-Firewall-1-INPUT 10 -m state --state NEW -p tcp --dport 5000 -j ACCEPT
|
Afterward, verify that the ports are open and above the REJECT line as outlined earlier.
|
# service iptables save
# service iptables restart
|
|
8.
|
If the PN has an Oracle database, install the RMAN scripts so that onQ can execute a hot backup of your database as outlined in Back up and restore Oracle 11g database on Linux.
|
Note: By default, wget preserves the original files. Newly retrieved install.py is saved with extensions .1, .2, etc. Use the -r option (see wget man page) to overwrite the existing file.
|
|
b.
|
From within a folder (/tmp) where you want to save the install script, run the following command:
|
|
# wget -r http://<onQ-IP-address>/install.py
|
|
# cd <onQ-IP-address>
# python ./install.py
|
|
e.
|
(Optional) Specify all valid values, excluding file system type and capacity because these values aren’t editable, in the node parameter fields provided and modify defaults as needed. (The install utility lists all available volumes/partitions/mount points and the onQ portal enforces any file system requirements as outlined in Linux RN Limitations.) You can make these node changes at any point after enrollment via the Protection Config tab in the onQ Portal.
|
|
f.
|
|
g.
|
Wait! Do not press Enter. Was the installation successful? Use the error messages below to evaluate the screen output.
|
|
•
|
If no, press Enter to launch the installer UI again. Correct the problem, then repeat Step e through Step g.
|
|
Install utility stops if you type incorrect/invalid values. Correct the problem and Save again or Cancel.
|
|
|
5.
|
Copy and modify /boot/grub/menu.lst:
|
|
•
|
7.0:
6.x:
5.x:
To find the driver versions packed inside the init ram file system (initramfs) of the boot menu: Locate the initramfs and kernel name from the boot menu prepared for the RN (you’ll find it under /boot), then use the following command to peek the contents of initramfs. For example:
|
# grep kernel /boot/grub/grub.conf.xvf5
# grep initrd /boot/grub/grub.conf.xvf5
# lsinitrd /boot/initramsfs-3.10.0-123.el7xen.x86_64.img|grep modules
|
|
# grep kernel /boot/grub/grub.conf.xvf5
# grep initrd /boot/grub/grub.conf.xvf5
# zcat /tmp/initrd-2.6.18-371.el5xen.img.5|cpio ‑t|grep ‑E “xen|ext”
|
|
7.
|
(Recommended) Disable the Network Manager service and Kudzu services, if installed, for self-tests to work correctly. This service is not useful in a server environment.
|
|
# service NetworkManager stop
# service NetworkManager status
# chkconfig NetworkManager off
# chkconfig --list NetworkManager
# service kudzu stop
# service kudzu status
# chkconfig kudzu off
# chkconfig --list kudzu
|
|
8.
|
Log on to the PN and open the following ports on the firewall in order for onQ to communicate with the PN.
|
|
•
|
UDP port 5990
|
|
•
|
|
# iptables -L –n | grep -E "5900|5000"
|
|
# iptables -L -line numbers
10 REJECT all -- anywhere anywhere reject-with icmp-host-prohibited
|
Using the line number of the REJECT line and the chain name (line 10 and line 1, respectively, in the step above), insert the onQ ports:
|
# iptables -I RH-Firewall-1-INPUT 10 -m state --state NEW -p tcp --dport 5990 -j ACCEPT
# iptables -I RH-Firewall-1-INPUT 10 -m state --state NEW -p tcp --dport 5000 -j ACCEPT
|
Afterward, verify that the ports are open and above the REJECT line as outlined earlier.
|
# service iptables save
# service iptables restart
|
|
9.
|
If the PN has an Oracle database, install the RMAN scripts so that onQ can execute a hot backup of your database as outlined in Back up and restore Oracle 11g database on Linux.
Unlike with Windows RNs, Linux RNs cannot be assigned to networks as outlined in Assign RNs to Networks. However, you can still enforce network settings for RN self-tests.
The Linux RN build should have a working NIC. If you have special need to set the RN’s NIC to a different IP, you can place a file, /opt/quorum/bin/xvf.dat, to generate /etc/sysconfig/network-scripts/ifcfg-eth0.
|
# cat /opt/quorum/bin/xvf.dat
|