Oracle recommends that you use RMAN to perform backups and restores of your databases.
Quorum’s pre_snap.sh script is optional; for example, you might prefer to use cron jobs or other scheduler; as such, discuss these options with your Linux Oracle Database Administrator.
|
1.
|
Download Quorum’s example scripts, then modify these scripts to fit your Oracle environment (RMAN version):
|
|
Performs the database backup by calling oracle_backup.sh.
There are many ways to trigger DB backup script: cron jobs, third-party scheduler, or application, for example; however, onQ Portal provides a way to trigger this pre_snap.sh script before it backs up the protected volumes (see Step 5).
|
|
|
ORACLE_BASE=/opt/oracle
ORACLE_HOME=$ORACLE_BASE/product/11.2.0/db_1
BACKUP_BASE=/backup01
BACKUP_AREA=${BACKUP_BASE}/rdbms/physical/orcl
BACKUP_LOG_DIR=~/oracle_backup
db=orcl
|
|
|
ORACLE_BASE=/opt/oracle
ORACLE_HOME=$ORACLE_BASE/product/11.2.0/db_1
BACKUP_BASE=/backup01
BACKUP_AREA=${BACKUP_BASE}/rdbms/physical/orcl
BACKUP_LOG_DIR=~/oracle_backup
db=orcl
|
|
|
Communicates pre_snap.sh execution status to onQ, and depends on armSender and vmmonCtl executables in x64 or i386 folder.
|
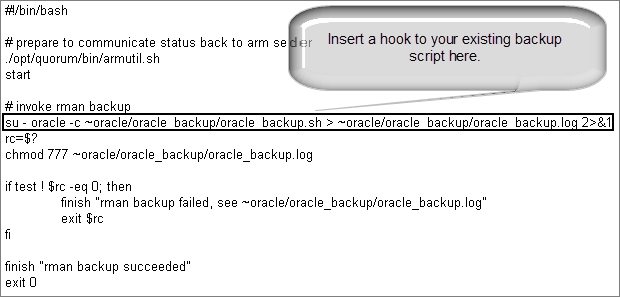
|
2.
|
Log on to the PN as oracle user (for example, su - oracle) and create a /home/oracle/oracle_backup directory.
|
|
3.
|
Now that you’ve modified oracle_backup.sh and oracle_restore.sh, copy them to /home/oracle/oracle_backup on the PN.
|
|
4.
|
As root user, copy armutil.sh and armSender and vmmonCtl from x64 or i386 folder, depending on the PN’s architecture, to /opt/quorum/bin on the Linux PN that’s running the Oracle database.
|
|
5.
|
As root user, copy pre_snap.sh to /opt/quorum/bin/ on the PN, then activate this script on the onQ Portal.
|
|
a.
|
Log on to the HA Appliance’s onQ Portal.
|
|
b.
|
From the PROTECTION CONFIG tab, select the PN that’s running the Oracle 11g database, then MODIFY > ADVANCED.
|
|
c.
|
Enable the pre snapshot script on that PN by selecting the Execute Pre Snapshot script?: Yes radio button.
|
This procedure works for Linux 6.2 RNs, though this procedure should also work on other os versions.
|
2.
|
Initiate a backup, or wait for a scheduled backup, of the protected node.
|
The PN’s Event Log displays the following messages as onQ builds the RN. These messages also appear in oracle_backup.log on the PN:
|
•
|
Pre-snapshot command returned: rman backup succeeded (as coded in pre_snap.sh), if rman backup passes. For example:
|
|
RHEL62x64-19-87: system: 2014-12-30 13:34:19: Pre-snapshot command returned: rman backup succeeded
|
|
•
|
Pre-snapshot command returned: rman backup failed (as coded in pre_snap.sh), if rman backup fails. For example:
|
|
RHEL62x64-19-87: system: 2014-12-30 13:11:37: Pre-snapshot command returned: rman backup failed, see ~oracle/oracle_backup/oracle_backup.log
|
If the RMAN backup fails, consult Oracle’s RMAN documentation to fix the problem. The RMAN backup must succeed before you proceed with the restore.
This procedure works for Linux 6.2 RNs, though this procedure should also work on other os versions.
|
1.
|
Start the Recovery Node in test mode, after the RN build completes.
|
|
•
|
|
[root@RHEL62x64-19-87 oracle_backup]# su - oracle
[oracle@RHEL62x64-19-87 ~]$ sqlplus / as sysdba
SQL> startup;
SQL> connect SCOTT/<password>
SQL> select count(*) from qa_test;
|
|
•
|
|
[root@RHEL62x64-19-87 oracle_backup]# su - oracle
[oracle@RHEL62x64-19-87 ~]$ sqlplus / as sysdba
SQL> startup;
|
|
# cd /home/oracle/oracle_backup
# ./oracle_restore.sh
|
|
[oracle@RHEL62x64-19-87 ~]$ cd /home/oracle/oracle_backup
[oracle@RHEL62x64-19-87 oracle_backup]$ ./oracle_restore.sh
RMAN> set echo on;
2> connect target *;
3> shutdown immediate;
4> startup mount;
5> restore database;
6> shutdown immediate;
7> startup mount;
8> recover database;
9> alter database open;
10> exit;
|
|
[oracle@RHEL62x64-19-87 oracle_backup]$ sqlplus / as sysdba
SQL> connect SCOTT/<password> ' Able to connect to DB after restore and recovery
SQL> select count(*) from qa_test;
|
|
4.
|
Start the Recovery Node in production mode; when prompted, do not remove the RN.
|