Create Custom Networks for RNs
If you currently segment your traffic using VLANs (virtual networks), you will want to replicate this configuration on your onQ. For example, your traffic might be segmented by internal and external (DMZ) traffic, by department, or iSCSI vs. SAN.
Quorum recommends that you set up these custom networks using the onQ Portal. Do not set up these custom networks on the onQ hypervisor directly. The onQ Portal provides all the bells and whistles to help you emulate your network easily and safely.
To create virtual networks:
1. Identify your
broadcast domains (aka VLAN IDs or VLAN tag), the ports that they comprise, and the PNs that reside in each network.
2. Log on to the onQ Appliance’s onQ Portal. You must log on as varadmin user. When you create a network on the HA, it does not automatically appear on the DR. You must make such changes on both onQ Appliances.
3. Click the APPLIANCE CONFIG tab > HYPERVISOR page.
4. Click the CUSTOM NETS button. The Modify Custom Networks dialog appears.
5. Specify the custom network parameters, click CREATE, then SAVE.
• Existing Custom Networks. If you’ve previously defined a custom network using the onQ Portal, it appears in this list; however, if you previously configured custom networks on the onQ hypervisor directly, the onQ Portal does not present these networks.
• Network Name. Specify a descriptive name that helps you identify this VLAN (or the type of traffic on this virtual network). For example, DMZ Traffic or Accounting Traffic. After you define your custom network, this network name appears in the Existing Custom Networks drop‑down list. Any virtual network that you create will be available as a test network or a production network.
• Local to this onQ. Checking this check box means that the network is only available to RNs of this onQ instance. Clearing the check box allows the network that you’re defining to be available to the RNs that belong to all onQ instances on the onQ Appliance.
• NIC Device # (-1 for virtual). Specify either -1 for virtual NIC or 1-4094 for a physical NIC. You cannot leave this field blank.
• VLAN Tag. Specify the unique identifier (aka VLAN ID or broadcast domain) for the virtual network. An identifier is inserted into a packet header in order to identify which VLAN the packet belongs to. Switches use the VLAN Tag to determine which port(s) or interface(s) to send a broadcast packet to. This tagging allows you to create multiple VLANs on the same physical interface.
Example: Separate VLAN for Accounting Traffic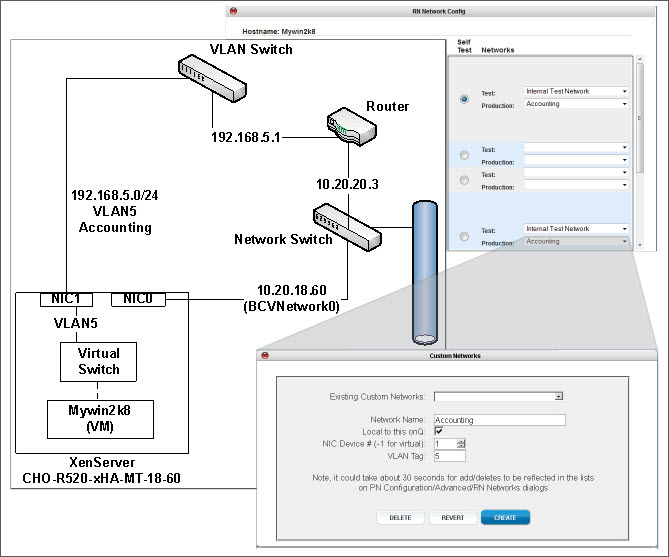
6. Now that you’ve created the networks, assign your RNs to those networks as outlined in
Assign RNs to Networks.