Step 3: (Hybrid Cloud Only) Create VPN connection to Hybrid Cloud
To access your Hybrid Cloud, you must do so using a VPN connection. Afterward, you can launch the web portal from your browser using the DR’s LAN IP address that your Quorum Support Engineer provided you.
The PPTP VPN connection to your Hybrid Cloud is very much dependent on the Internet performance available to you and the system performance of the computer from which you are initiating the connection.
For support with connecting to the Hybrid Cloud, contact Quorum Support at support@quorum.net.
To create a connection to Hybrid Cloud (Windows 7):
This procedure assumes that the client on which you are creating this VPN connection is running Windows 7 with XenCenter installed.
1. Retrieve the following information:
• Public IP address and logon credentials of the DR. This information was provided by your Quorum Support Engineer.
• LAN IP address of DR in the Quorum cloud.
2. Configure your network firewall to allow PPTP Outbound Traffic.
3. Run Software Update to ensure that your installation is running the latest updates.
4. From the Control Panel, launch the Network and Sharing Center, then click Set up a new connection or network link.
5. In the Choose a connection option pane, choose Connect to a workplace, then Next.
6. In the How do you want to connect pane, select Use my Internet connection (VPN).
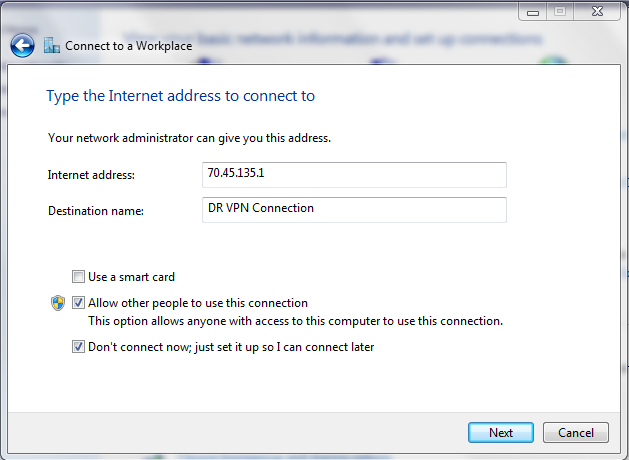
7. Complete the following fields and options as follows, then Next.
Internet Address | Provide the public IP that Quorum Support provided you. |
Destination Name | Type a name for the connection. For example, DR VPN Connection. |
Allow other people to use this connection | Select this check box. |
Don't Connect now; just set it up so I can connect later | Select this check box. |
8. Type in your user name and password that your Quorum Support Engineer provided you and leave the domain field blank, then Create.
Do not connect yet. Click
Close.

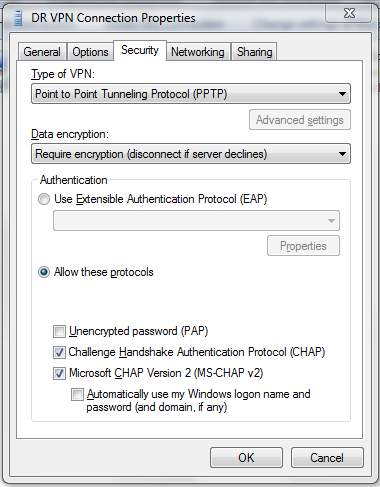
9. Configure the connection to use PPTP protocol:
a. From Network and Sharing Center, click on the Change Adapter Settings link in the left pane.
b. Right‑click on DR VPN Connection, then Properties.
c. From the Security tab > Type of VPN drop‑down, choose Port to Port Tunneling Protocol (PPTP).
d. Accept all remaining defaults. No further settings are required, then
OK.
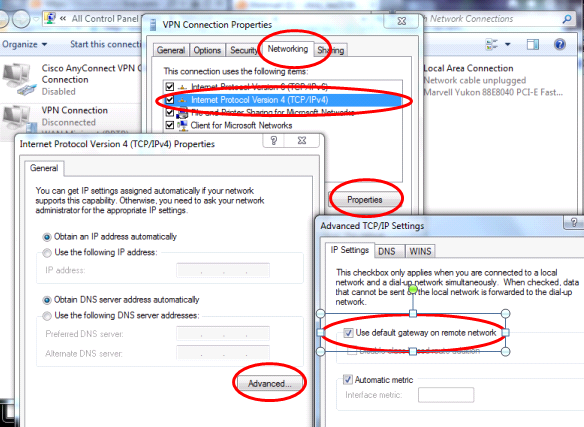
10. Set remote gateway as the default gateway:
a. Right‑click on DR VPN Connection, then Connect.
b. Go to the
Networking tab >
IPv4 >
Properties >
Advanced. Deselect the
Use default gateway on remote network check box.
12. Verify that the DR is up. From a command line prompt, ping the DR DR’s LAN IP address.
13. Log on to the DR’s web portal. From a web browser, go to https://<DR-LAN-IP-Address>.
You should now have full access to the RNs and File Level Backups on the DR.
To create a connection to Hybrid Cloud (Windows XP):
This procedure assumes that the client on which you are creating this VPN connection is running Windows XP with XenCenter installed.
1. Retrieve the following information:
• Public IP address and logon credentials of the DR. This information was provided by your Quorum Support Engineer.
• LAN IP address of DR in the Quorum cloud.
2. Configure your network firewall to allow PPTP Outbound Traffic.
3. Run Software Update to ensure that your installation is running the latest updates.
4. From the Control Panel, launch the Network and Sharing Center, then click Create a new connection link.
5. In the New Connection wizard, click Next.
6. Select Connect to the network at my workplace radio button, then click Next.
7. Select Virtual Private Network connection radio button, then Next.
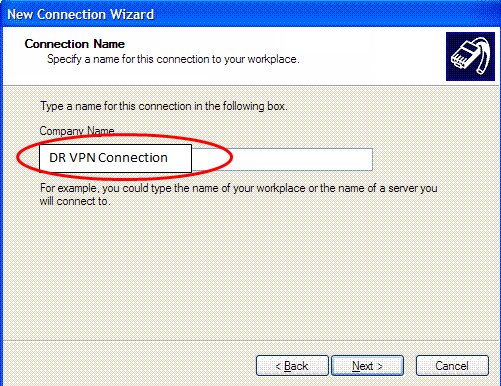
8. In the
Company Name text box, type
DR VPN Connection as the connection name, then
Next.
9. If prompted select the Do not dial the initial connection radio button, then Next.
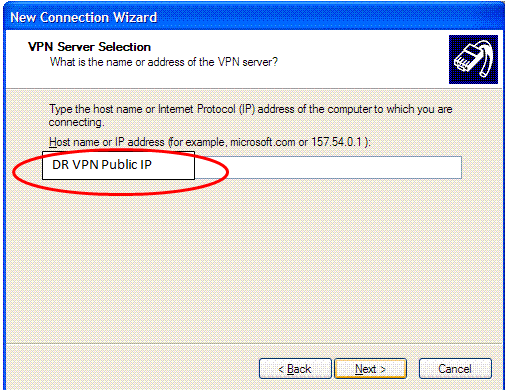
10. In the
Host name or IP Address... text box, type the DR’s Public IP address provided by your Quorum Support Engineer, then
Next.
11. If prompted select either Anyone's use or My use only, then Next, then Finish.
12. Modify the connection’s settings:
a. Click on the Properties button.
b. Click on the Networking tab.
c. Highlight Internet Protocol (TCP/IP), then Properties.
d. Click on the Advanced button.
e. Clear the Use default gateway on remote network check box, then OK until you return to the logon window, accepting all previously defined settings.
14. Verify that the DR is up. From a command line prompt, ping the DR’s LAN IP address.
15. Log on to the DR’s web portal. From a web browser, go to https://<DR-LAN-IP-Address>.
You should now have full access to the RNs and File Level Backups on the DR.
To create a connection to Hybrid Cloud (Mac OS X):
This procedure assumes that the client on which you are creating this VPN connection is running Mac .OS X.
1. Retrieve the following information:
• Public IP address and logon credentials of the DR. This information was provided by your Quorum Support Engineer.
• LAN IP address of DR in the Quorum cloud
2. Configure your network firewall to allow PPTP Outbound Traffic.
3. Run Software Update to ensure that your installation is running the latest updates.
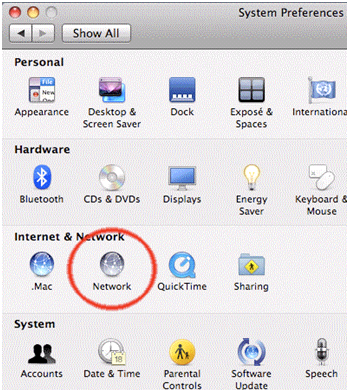
4. Open the Network Control Panel:
System Preferences >
Network.
5. Create a new VPN connection:
a. From the Network page, click the plus (+) icon in the left panel.
A new service sheet appears.
b. Click on the Interface popup menu to specify the properties for this new connection.
c. In the Interface drop‑down list, choose VPN.
d. In the VPN Type drop‑down list, choose PPTP.
e. In the
Service Name field, name this new connection
Quorum (PPTP).
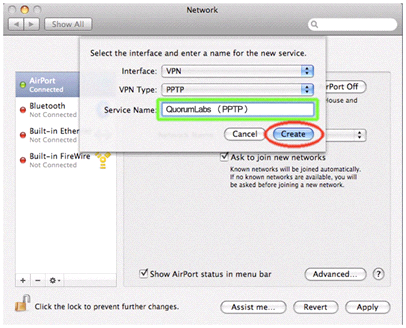
f. Click Create.
This new connection appears in the list of connections in the left pane.
6. Make a new Quorum configuration:
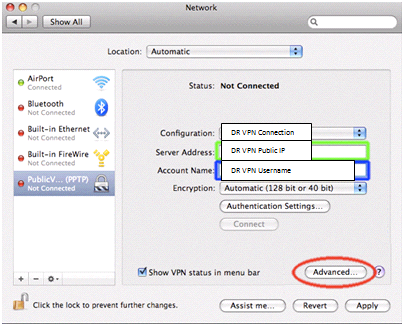
a. From the Network page, click the Configuration drop‑down list, then Add Configuration.
If you set up the VPN previously, the configuration appears in the list.
b. In the Configuration field, type Quorum (PPTP), then Create.
c. In the Server Address and Account Name fields, specify the Quorum IP address (WAN IP address) and Quorum username.
d. In the Encryption drop‑down, choose Automatic (128 bit or 40 bit).
e. Click on the
Authentication Settings... button. The
User Authentication dialog appears.
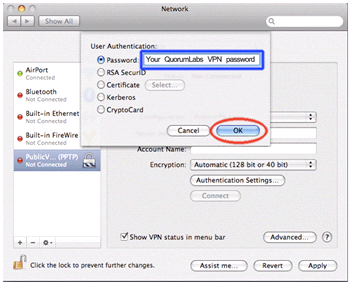
f. In the
Password radio button field, specify your Quorum username, then
OK.
7. Adjust the VPN settings:
a. From the Network page, click the Advanced... button at the bottom of the page.
b. Select the Send all traffic over VPN connection check box. You must do so in order for the connection to work effectively.
c. (Recommended) Select the Use verbose logging check box. This option makes it easier to see additional information in the event that you have connection problems.
d. Click OK.
8. Save the configuration. Click Apply in the bottom right of the Network page.
10. Verify that the DR is up. From a command line prompt, ping the DR’s LAN IP address.
11. Log on to the DR’s web portal. From a web browser, go to https://<DR-LAN-IP-Address>.
You should now have full access to the RNs and File Level Backups on the DR.