Perform File‑level Restore
onQ provides a way for you to retrieve any combination of files and folders or entire drives from existing snapshots of any protected node. This process is known as a file‑level restore (FLR).
If, however, your protected node’s server failed, you need to perform a bare metal restore (BMR) as outlined in
Restore PNs Using QUARK.
You can choose to replace the current file, folder, or drive, or to store it on any protected node or standalone server so long as it is reachable from your network.
| Note: FLR is supported for both Windows and Linux‑based protected nodes, though the example below demonstrates a recovery using a Windows‑based protected node. |
To retrieve a snapshot, using FLR:
Before you begin:
Review the limitations outlined in
File‑level Restore Limitations.
Ensure that you have the
nc utility installed as outlined in
(Agent‑based Linux PNs) Enroll protected nodes.
1. Log on to the Appliance’s onQ Portal.
2. Click on the RESTORE tab > FILES page.
A page similar to the following appears:
In the case of Agent‑less PNs, do not restore
C:\QuorumHomeDir\ or
/data/QuorumHomeDir as these volumes are for implementation purposes only and do not reside on the PN itself:

3. In the Available Snapshots pane, expand the folder for the protected node.
4. Double‑click on the snapshot that contains the data you want to restore.
A page, labeled
Step 1, appears:
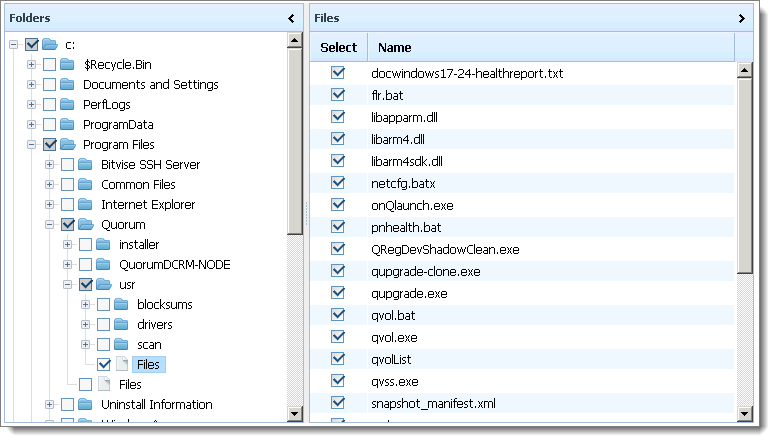
5. Specify the files you want to retrieve. Expand the hierarchy on the left, select the desired folder or files, then click NEXT:
• For each folder, select the check box to select all of its contents.
• Click Files to display the individual files in the content pane to the right. Then, in the content pane, you can select the individual files that you want.
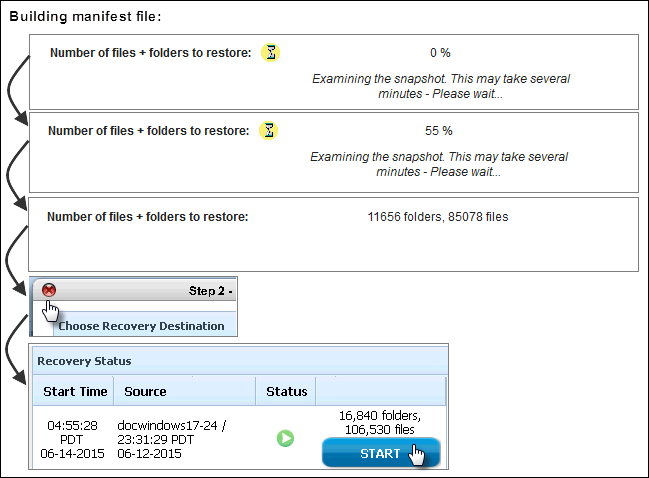
onQ begins to build the manifest file. If this process completes within minutes, proceed to
Step 7.
| Note: Depending on the number of files, onQ may require a few hours to build the manifest file; in this case, allow onQ to build the manifest file. Return to the onQ Portal at a later time to initiate the restore from the prebuilt manifest: RESTORE tab > Recovery Status pane > START button. If, after the manifest builds, you attempt to perform the restore again by selecting the files again, onQ Portal prompts you to choose the existing manifest ( No) or to build a new one ( Yes). 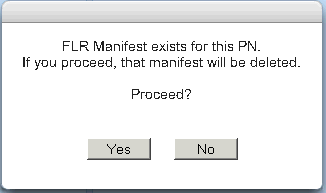 |
6. Initiate the restore:
RESTORE tab >
Recovery Status pane >
START button.
7. Before you proceed with the restore, decide on the host to which you want to restore the files.
• Do you want to restore to a Protected Node? You can restore to the same or different Protected Node.
• Do you want to restore to a Standalone Server? Do so if you’d like to inspect the files before you restore a Protected Node with them.
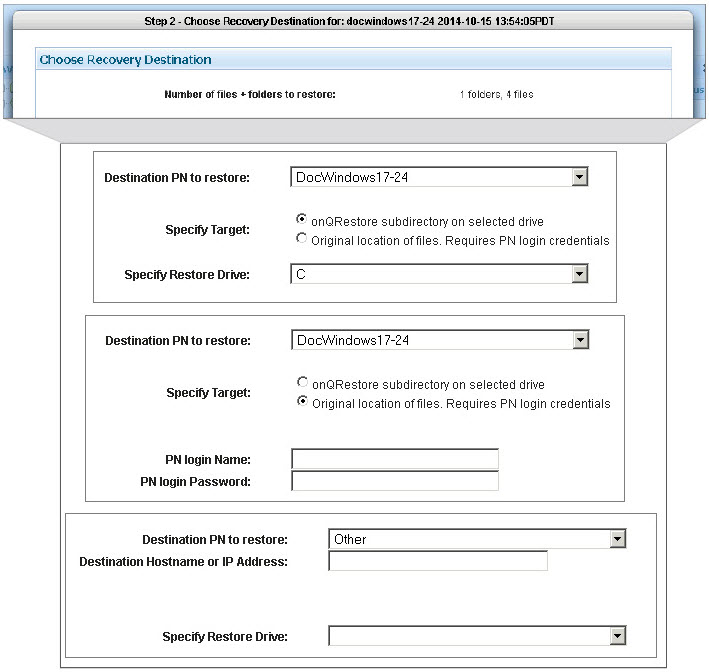
8. Do the following:
a. In the Destination PN to restore drop‑down, specify the recovery destinations host where you want to store the retrieved files. The destination can be one of the following:
<
Host>. This destination is a PN, either the same PN or a different PN. Choose this option if you chose “Protected Node” in
Step 7. To ensure that you restore your files correctly, only Pens that share the same operating system as the host that owns the snapshot that you want to restore appear in the list. If applicable, in the
Specify Restore Drive drop‑down, choose a drive to which you want to save the files
Other. This destination is a host that is not a PN. Choose this option if you chose “Standalone Server” in
Step 7. If you have an agent‑less PN, this is the only supported option for FLR. When you select
Other, a text box appears labeled
Destination hostname or IP address. Type the address of your desired destination server. In the
Specify Restore Drive drop‑down, choose a drive to which you want to save the files.
Skip to
Step c.
b. If applicable, in the Specify Target field, choose a target. A target can be one of the following: (1)
• onQ Restore subdirectory on selected drive. The files will automatically be saved to a default restore location on the drive that you select and that distinguishes the FLR from multiple different snapshots and maintains the relation of the files to a given snapshot:
(Windows) – driveLetter:\onQRestore\pnName AND snapShot timeStamp.
(Linux) – mountPoint/onQRestore/pnName/snapShot timeStamp. /onQRestore... if you chose /or /boot/onQRestore... if you chose /boot.
• Original location of files. Choose this option if you want to overwrite the existing files. There are limitations to this option (see
File‑level Restore Limitations). Skip to
Step 9.
c. If you want to restore to a Standalone Server, which, unlike a restore to a PN, does not already have the onQ Service installed, do one of the following to open up a communication “channel” between the onQ Appliance and the Standalone Server:
• (Windows/Automatic Process) Type the PN’s credentials, then wait for WVhds_<build>.exe to automatically validate those credentials. These credentials are not stored on the onQ in any database or log file.
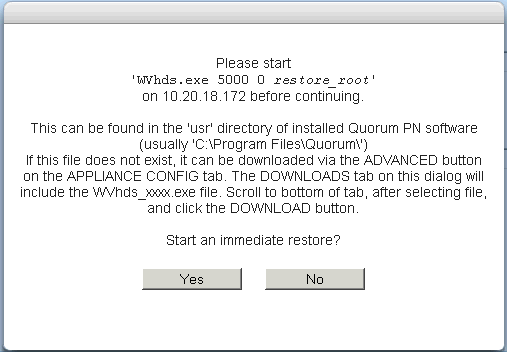
• (Windows/Manual Process) Download and execute WVhdS_<build>.exe on the remote host as the example below shows. Retrieve this file from APPLIANCE CONFIG tab > ADVANCED button > DOWNLOADS subtab. From a DOS prompt, run the following command:
# WVhdS_version.exe 5000 0 restore-location |
For example:
(where
c:\temp in the following example is the restore location)

• (Linux/Manual Process) Download and execute onQFLRSelf.sh, which automatically untars a file to the recipient that you define, on the remote host. Retrieve this file from APPLIANCE CONFIG tab > ADVANCED button > DOWNLOADS subtab.
# cd <restore-location> # wget http://<OnQ-IP-address>/onQFLRSelf.sh # sh onQFLRSelf.sh |
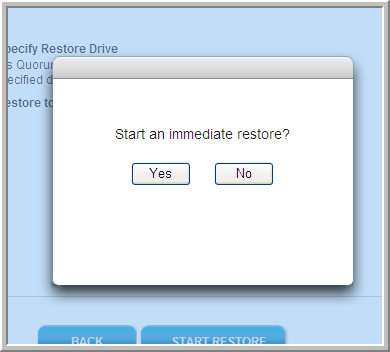
9. Begin the restoration. Click START RESTORE, then click Yes to confirm:
| Note: Protection must be ON in order for the START RESTORE button to appear. |
If you chose to restore to a PN: | |
If you chose to restore to a Standalone Server: | |
If restore completes, output indicates All done: 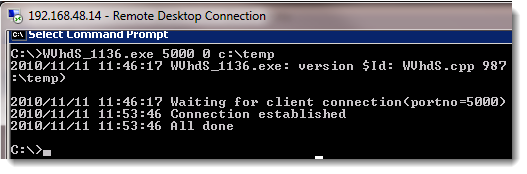 |
Afterward, the onQ Portal returns you to the main RESTORE page.
10. Verify that your restore completed successfully:
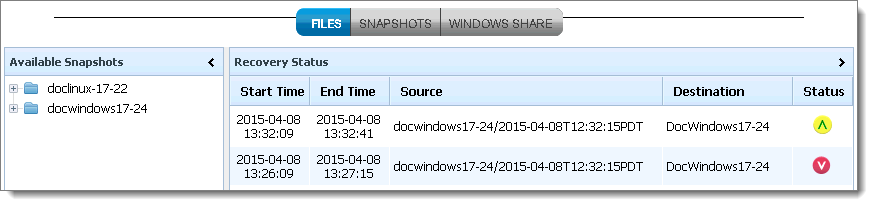
a. Observe Snapshot status (RESTORE tab > FILES page > Recovery Status pane > Status column):
• The left pane (Available Snapshots) shows available snapshots, as folders, listed in a hierarchical structure by node, date, and time.
• The right pane (Recovery Status) shows your previous efforts at retrieving files from snapshots. The carat to the right symbolizes the result of each restore attempt.
• A RESTART button appears for any status other than Completed OK. Click the RESTART button to restart the FLR. The restart process does not recreate the manifest file.
Status | Completed OK carat is green and points upward | Restore finished successfully. If you roll your cursor over the icon, hover‑over help displays the message. |
Incomplete(NetworkErr) carat is red and points downward | Restore failed. The Status icon’s hover‑over help displays the reason for the failure. This error can occur if the Netcat ( nc)utility is not installed on the target Linux node as outlined in (Agent‑based Linux PNs) Enroll protected nodes. Also, if this utility is missing, your var/log/messages indicate: /opt/quorum/bin/./FLR.sh: line 44: /usr/bin/nc: No such file or directory. |
Incomplete Client: Unable to connect to FLR server carat is red and points downward | Restore failed. The Status icon’s hover‑over help displays the reason for the failure. |
Incomplete carat is red and points downward | Restore failed. The Status icon’s hover‑over help displays the reason for the failure; this message is common when you type the incorrect credentials for the PN. |
Incomplete(ReplyError) carat is red and points downward | Restore failed. The Status icon’s hover‑over help displays the reason for the failure. |
Completed with errors  carat is yellow and points upward | The restore process didn't report that the FLR completed and didn't result in an abort. An error that cannot be attributed to the other errors in this table are categorized as Completed with errors. Whether FLR or QUARK‑based, a restore involves a pair of processes: R2V and WVHSDS. To view the specific errors, browse the target’s quorum wvhds.log and the onQ Appliance’s /var/log/r2v.log. |
| Incomplete: Unexpected Disconnect | Restore was interrupted, probably due to a timeout. |
b. (Standalone Server) Verify that the restored files appear in the expected destination.