Schedule backups
onQ performs an
initial backup of your PN when you first
start protection on your nodes. For all subsequent backups, you can instruct onQ when and how often to perform those backups. Each protected node has its own backup schedule with backups to occur at varying times, days of the week, and frequencies. Such granular scheduling is essential for those networks with low bandwidth.
onQ has two built‑in policies that affect backups:
• if an HA’s repository disk space utilization exceeds 85%, onQ deletes old backups. See
A0103 for more information.
• if an HA’s repository disk space utilization exceeds 85%, onQ disables schedule backups globally, logging a Scheduled backup request skipped while backups suspended error message and resumes scheduled backups when disk space utilization improves (less than 85%); however, during this time, you can perform immediate backups. This suspension policy attempts to prevent your HA from using 100% of its repository’s disk space. onQ does not suspend in‑progress backups.
To create or change the backup schedule:
This schedule is automatically transferred to the DR Appliance. In the event of a disaster and if the DR Appliance takes on the HA role, the same backup schedule continues.
1. Log on to the HA’s onQ Portal.
2. Go to PROTECTION CONFIG tab, select the PN, then click the MODIFY button.
3. In the Backup Schedule field, click the SCHEDULE button.
4. Configure your schedule. You can create as many schedules as you want. The scheduler prevents you from creating schedule overlaps. If you want to return the default schedule, click CLEAR.
For example, let’s assume you have very little network bandwidth and peak hours of operation are M-F 5am to 11pm and business activity is light on Saturdays with minimal changes and no activity on Sundays. Simply set the schedule as follows:
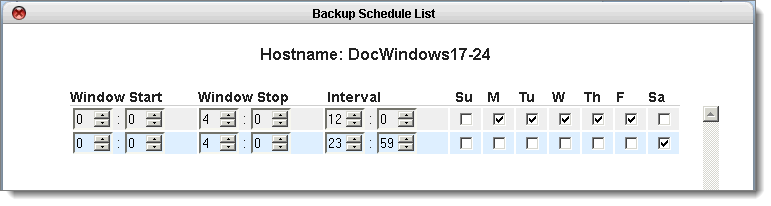
Window Start: Based on a 24‑hr clock, select the time of day to start the backup. Choose a time when the network is the least busy. The
initial backup can take a considerable amount of time. Subsequent backups record only changes that have occurred since the preceding backup and so will be relatively brief.
Window Stop: Based on a 24‑hr clock, select the time of day to stop the initiation of new backups. Any backups currently running at the time of the stop period will be allowed to complete. As outlined in
Stop in‑progress backups, you can stop these backups.
Interval. The interval (in minutes/hours) between the start of the data backup and the next data backup. Basically, the interval represents the frequency of backups. Valid values: hour,
0-23; minute,
0-59. As with any backup solution, this interval represents your potential data loss in the event of a failure (aka
RPO).The shortest interval is 15 minutes, which is impractical for an onQ that’s protecting a large number of PNs, possibly resulting in queued backups as outlined in
Stop in‑progress backups. If you are not sure what interval to specify, a 4‑hr interval is common in enterprises with high network bandwidth and 24-hr interval in low network bandwidth.
Days: Select the check box for the day(s) of the week for which you’d like this policy to apply. If you don’t have business activity (for example, Sunday) on a given day, clear that check box.
That’s it!